Haven't posted in a while so here is what I was up to. At the end of the last year I worked with animationRigs.com and Motion Grinder on one of the oldest and coolest game series ever made. It was my job to take care of weight painting and to create poses for the facial rigs of Rudi, Agent One and a few other characters. Here is the game in its full glory:
Sprite Slicer is a tool that significantly speeds up the creation of image planes or sprites in Maya. It automatically generates the planes in the correct aspect ratio with perfectly aligned UVs. The smart algorithm in Bounds mode recognizes all separate shapes and creates sprites for them. Additional settings allow you to fine tweak the shape recognition.
The tool is also great for importing of reference images or any textured planes that will be used for modeling, for example hair strands, grass, leaves...
Watch the video to see how the tool works and to see different import modes in action:
The dragon character is from Bubble Rumble, download it for IOS and Andorid.
If the video is not enough here is a reference for all of the tools options:
Name: Specify the name that all the sprites will be named to. They will automatically be numbered. If no name is specified, "sprite" will be added as the default name.
Sprite Sheet: URL for the image to be loaded. It can be entered by hand or if you click the folder icon a dialog will open that will allow you to specify an image on your system.
Pivot Location: Specify the region of the sprites that their pivot will be snapped to. The pivot can later be edited by Maya's standard tools or by going into the top menu of Sprite Slicer and selecting an option from Geo/Set Pivot.
Pixels Per Unit: This value specifies how many pixels are going to be created per one Maya unit. In other words it specifies the scale of the image planes. The larger the value the smaller the planes will be, and vice versa.
Subdivisions: The created planes will be subdivided in width and height by the amount specified in these two boxes.
Bounds: In this mode the sprites will be created for all separate shapes in the image. These shapes can later be combined with Maya's modeling tools or by selecting them and clicking on Geo/Combine option in Sprite Slicer's top menu.
Min Pixels: Minimum number of pixels that every separate shapes need to have in order to be considered a separate sprite. Tweak this amount if your sheet contains stray pixels or very small shapes that are part of a larger shape.
Min Opacity: Specify a value between 0.0 and 1.0 and the pixels that have an alpha value lower than the specified value will be ignored when searching for separate shapes.
Diagonal Check: When importing very small sprites, like pixel art, this option allows you to specify if you want to consider pixels that are connected only by their corners as part of the same shape. Keep this option unchecked if importing larger images since it will unnecessarily slow things down.
Grid: In this mode the sprites will be created based on the sprite size that is specified in the fields bellow.
Sprite Size: The size of the sprites by which the sheet will be divided. These values are in pixels. The tool will start to fit as many sprites as it can, starting from the top left corner.
Offset: Starting from the top left corner of the image the amount specified here will offset the sprites. These values are in pixels.
Padding: These values separate the sprites from each other by the amounts specified. These values are in pixels.
Ratio: In this mode the image is cut into a grid based on the ratio specified in the fields below.
Divisions: The ratio that the image will be cut in. The X amount is the number of sprites columns in the grid and the Y amount is the number of rows in the grid.
Offset: Similar to the offset in Grid mode, only in this mode you have the option to offset from all four sides of the image.These values are in pixels.
Padding: These values separate the sprites from each other by the amounts specified. These values are in pixels.
Load: Import the selected image with the specified options.
Cancel: Discard the specified options and close the Sprite Slicer window.
Edit: The Reset Settings option is in this menu. It resets all the values to their defaults
Geo:
Combine: Combine the selected planes. You need to have at least two meshes selected.
Set Pivot: Sets the pivot of the selected objects to the specified corner.
Help: A link that opens in your browser and it brings you to this page.
01. Elephant Rig
Creature rigging in Autodesk Maya using Maya Muscle. A custom flexible
auto rigging script for the Variable FK trunk was written in PyMel.
02. Variable Foot
Organic and flexible foot posing using only a couple of controls without
stacking of a large number of variable foot parameters. This solution
allows the animator to position the pivot on any part of the foot and
control the direction and falloff of the bend.
03. Delta Mush
This deformer is based on Voodoo's Delta Mush deformer and requires
almost no skinning work to be done. Using the vertices tangent space it
provides a smart deformer that preserves volume and shape.
04. Smooth Skin Decomposition
The results of using the Delta Mush deformer are decomposed and applied
to the rigid skin of the character. This solution produces a skin with
deformations that are as close as possible to the Delta Mush
deformations.
05. Bezier Spine
An animation friendly spine rig that uses a minimum amount of animation
controls without sacrificing any flexibility. The chest and hip
controllers can change their location and provide different points from
which the spine bends. By adjusting the chest and hips tangent handles
the spine shape can be further defined and tweaked.
06. Shape Rasterizer
A 3D shape is projected onto a plannar mesh and rasterized to create a
look that immitates low resolution screens. The shapes vertex colors are
used to define the colors of this rasterized shape.
07. Herman and Chad
Responsible for body and facial rigs, skinning, UI writing and rig maintenance.
08. Spherical Mirror
Written in Fabric Splice for Maya. Creates a mesh instance that is mirrored using a spherical mirror. Supports animation.
09. Wheel and Threads Node
Custom node written in Fabric Splice for Maya. The node provides a
complete solution for wheels and threads. The wheel rotation works in
world space and works in any direction. The same is true for the
threads. The thread mesh is automatically instanced and the thread
control points define the shape, size and rotation of the threads.
I'll show you how you can use some basic math knowledge to manipulate points in 3D space. Knowing vectors and points will allow you to fully understand how objects are positioned, translated around, how matrices work, how quaternions are rotated, aim constrains calculated and much, much more.
First let me show you what we will be making and after that you will see how easy it is to make something like this:
The Zetz character is designed by Boris Stapic and the model and textures are from Seid Tursic.
This is made using Fabric Splice in Maya. Here is the download link for the splice file. Have fun with it. I will not cover the Splice part in this tutorial but you can go through my code and see how it is written. I also included some debuging code that draws the sphere.
I will be writing the tutorial in pseudo code, and everything might not be notated to mathematical standards. I'm trying to make everything easy to read and I leave it to you to figure out how to do it in the language and software of your choice.
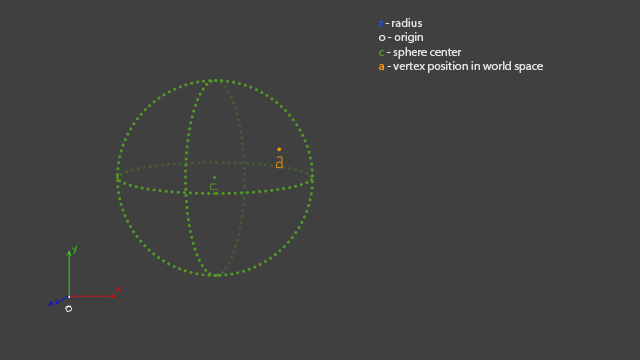
So, here is what we are going to start with:
The origin is just the center of our world, radius is going to be an attribute that the user can modify, sphere center is the location of our sphere and the vertex position is what you will get from your application when you query the location of a vertex. This doesn't have to handle vertices, you can write a version that mirrors locators or any other objects.
Now we have to calculate a vector that will point from "c" to "a" so we know in what direction to mirror the object.
The next step is to make "a`" go from "c" to the spheres border. That is easy to achieve. We need to make "a`" a unit vector ( we set its length to 1 ) and we multiply that unit vector with the radius.
To know how far the mirrored point needs to be from the spheres center we need to calculate a multiplication factor. The factor is the number that we get when we divide the radius by the length of "a`". We will multiply "b" with this factor to get the position of our mirrored point.
Now we have our point mirrored and its location based on the sphere center. In order to get the location in the world we add up this vector to "c".
And that is how we go from "a" to "am". I leave it to you to write this in the software of your choice and if you have any further questions write them in the comments. But first make sure to try and figure everything out by yourself.
If you have not already seen Hans Godard's vimeo page then you should go there now. That man does some great work and is a huge inspiration.
His latest video demos a workflow for automatizing smooth skinning. I tried to do something similar but couldn't crack the math for SSD. So I did it my own way. The most important thing is that it works and gives good results.
My version is based on Splice and Python. Python slows things down a lot but I am getting into C++ so the next version will be full Maya C++ API.
Even with Python I didn't have to wait too long. With a 12k vert mesh and 85 skinned joints the procedure was done in a bit more than 5 minutes 3m30s (did some optimizing). That still beats doing it by hand and painting the weights until the wrists start to hurt.
A big thank you to Jonas Törnqvist for giving me the model for testing. Great modeler and a great guy.
Combining the best out of FK and IK spine rigs and adding even more. IK/FK spines are allow much control over the torso but are tedious to animate. A lot of layered controls on top of each other can require some counter rotating and produce gimble issues. With this setup the animator can rotate from various points on the spine. Similar to FK but FK requires the user to distribute the rotation across multiple controls if fluid shapes are required. And they always are.
On my setup most of the posing is handled with the rotation of the two main controls and can be further refined using the tangent controls and the translation of the main controls.
Advanced volume preservation controls plus the IK like behavior that can be achieved with this setup are great for stylized animations.
The foot is one of the areas that doesn't get special attention when rigging a character. Many rigs have the standard inverse foot setup that makes the animator slide a bunch of attributes and try to get something they like.
I like to keep everything on the character without messing too much with sliding numbers in tiny boxes. That way the animator can quickly experiment with poses and get organic shapes.
As seen in the video the foot is really flexible and allows for easy posing. The bend control can moved to any point along the foot and make the foot bend in any direction. The only slider that requires the animator to take his/hers eyes of the character is used to control the falloff. Falloff control allows the foot to peel nicely from the ground or to bend at a harsh angle. The foot uses the same rig for both IK and FK modes.